Tuesday 8 December 2015

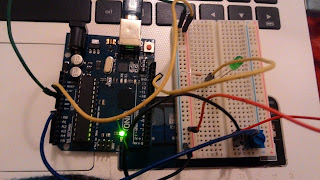
Arduino Challenge 7: Buzzer (Make Your Own Challenge)

Challenge Name: Buzzer & Light Sensor

Author: Christina He

Credit: New Innovators.com Lab 7

Time to Complete: Approximately 10 min

Difficulty Level: Level 1

Challenge Description: Make a program that the buzzer will sing "Ode To Joy".

Answer:

Code

int speakerPin = 9;
int length = 15;
char notes[] = "eefggfedccdeeddeefggfedccdedcc ";
int beats[] = { 1, 1, 1, 1, 1, 1, 1, 1, 1, 1, 1, 1, 2, 1, 1 , 1, 1, 1, 1, 1, 1, 1, 1, 1, 1, 1, 1, 2, 1 ,1 };
int tempo = 300;
void playTone(int tone, int duration)
{
  for (long i = 0; i < duration * 1000L; i += tone * 2)
  {
    digitalWrite(speakerPin, HIGH);
    delayMicroseconds(tone);
    digitalWrite(speakerPin, LOW);
    delayMicroseconds(tone);
  }
}
void playNote(char note, int duration)
{
  char names[] = { 'c', 'd', 'e', 'f', 'g', 'a', 'b', 'C' };
  int tones[] = { 1915, 1700, 1519, 1432, 1275, 1136, 1014, 956 };
  for (int i = 0; i < 8; i++)
  {
     if (names[i] == note)
    {
      playTone(tones[i], duration);
      delay(2000);
    }
  }
}
void setup()
{
  pinMode(speakerPin, OUTPUT);
}
void loop()
{
  for (int i = 0; i < length; i++)
  {
    if (notes[i] == ' ')
    {
      delay(beats[i] * tempo);
    }
    else
    {
      playNote(notes[i], beats[i] * tempo);
     }
    delay(tempo / 2);
  }

}

Visual Answer


Arduino Challenge 6: Light Sensor (Make Your Own Challenge)

Challenge Name: Light Sensor & RGB LED

Author: Christina He

Credit: New Innovators: Lab 6

Difficulty Level: Level 5

Time to Complete: Approximately 35 minute

Challenge Description: Make the RGB LED change colours using the light sensor. When the light sensor is covered, the RGB will switch to red (pink) and green from blue. When the light sensor is released, the RGB will switch back and stay at blue.

Answer:

Code

int lightPin = 0;
int redrgb = 11;
int greenrgb = 10;
int bluergb = 9;

void setup()
{
  pinMode (redrgb, OUTPUT);
  pinMode(greenrgb, OUTPUT);
  pinMode(bluergb, OUTPUT);
}
void loop()
{
  int lightLevel = analogRead(lightPin);
  lightLevel = map(lightLevel, 0, 900, 0, 255);
  lightLevel = constrain(lightLevel, 0, 255);
  analogWrite(redrgb, lightLevel);
  delay(100);
  analogWrite(greenrgb,lightLevel);
  delay(100);
  analogWrite(bluergb, lightLevel);
  delay(100);
}

Visual Answer


(colours not showing up properly, but the order is: blue, red(pink), green, and back to blue)

Arduino Challenge 5: RGB LED (Make Your Own Challenge)

Challenge Name: RGB LED & Potentiometer

Author: Christina He

Credit: New Innovatos: Lab 5

Difficulty: Level 3

Time to Complete: Approximately 40 min

Challenge Description: Make the RGB LED to change colours when twisting the potentiometer.

Answer:

Code

const int red= 9;
const int green= 10;
const int blue= 11;
const int pot= A0;

const int distime= 100;

void setup()
{
  pinMode(pot, INPUT);
}

void loop()
{
  int a=analogRead(pot)/63.75;
  if (a==4)
  {
    analogWrite(green,255);
    delay(distime);
    analogWrite(green,0);
  }
  else if (a==3)
  {
    analogWrite(blue, 255);
    delay(distime);
    analogWrite(blue,0);
  }
  else
  {
    analogWrite (red,255);
    delay(distime);
    analogWrite(red,0);
  }

}

Visual Answer


Arduino Lab 4 Potentiometer (Twist Plot): Mandatory Challenge Completed

The following code is what I wrote to complete Arduino Lab 4 mandatory challenge. Visual evidence are also provided.

Code:

int sensorPin = A0;
int ledPins[] = {6,9,10,11};

void setup()
{
  pinMode(sensorPin,INPUT);
  pinMode(ledPins[1,2,3,4], OUTPUT);
}
void loop()
{
  int a = analogRead(sensorPin)/63.75;
  if (a == 4)
  {
    for (int i = 0; i<5; i+=1)
    {
      analogWrite(ledPins[i], HIGH);
      delay(100);
    }
  }
  else if (a == 3)
  {
    for (int t = 0; t<4; t+=1)
    {
      analogWrite(ledPins[t], HIGH);
      delay(100);
    }
  }
  else if (a == 2)
  {
    for (int x=0; x<3; x+=1)
    {
      analogWrite(ledPins[x], HIGH);
      delay(100);
    }
  }
  else if (a ==1)
  {
    for (int y=0; y<2; y+=1)
    {
      analogWrite(ledPins[y],HIGH);
      delay(100);
    }
  }
  else
  {
    for (int g=0; g<5; g+=1)
    {
      digitalWrite(ledPins[g], LOW);
    }
  }
}

Visual Evidence:


Arduino Challenge 4: Potentiometer (Make Your Own Challenge)

Challenge Name: Poteniometer & LED Brightness

Author: Christina He

Credit: New Innovators.ca Lab 4

Difficulty Level: Level 2

Time to Complete: Approximately 30 min

Challenge Description: Make one LED to blink with different levels of brightness by twisting the potentiometer.

Answer:

Code

int ledPin = 13;
int value = 0;
void setup()
{
  pinMode (ledPin , OUTPUT);
  pinMode(sensorPin, INPUT);
}
void loop()
{
  value = analogRead(sensorPin);
  analogWrite(ledPin , value);
  delay(100);

}

Visual Answer


Arduino Lab 3 Button Control: Mandatory Challenge Completed (part 1&2)

The following code is what I wrote for Arduino Lab 3 mandatory challenge. Visual evidence are also provided.

Code:

(part 1)
int led1 = 0;
int led2 = 1;
int led3 = 2;
int led4 = 3;

int button1 = 8;
int button2 = 9;

void setup()
{
  pinMode(led1,OUTPUT);
  pinMode(led2,OUTPUT);
  pinMode(led3,OUTPUT);
  pinMode(led4,OUTPUT);
  pinMode(button2,INPUT);
  pinMode(button1,INPUT);
}

void loop()
{
  int delaytime = 500;
  if (digitalRead(button1) == HIGH)
  {
    digitalWrite(led2,HIGH);
    digitalWrite(led4,HIGH);
    delay(delaytime);
    digitalWrite(led2,LOW);
    digitalWrite(led4,LOW);
 
  }
  else if (digitalRead(button2) == HIGH)
  {
    digitalWrite(led1,HIGH);
    digitalWrite(led3,HIGH);
    delay(delaytime);
    digitalWrite(led1,LOW);
    digitalWrite(led3,LOW);
  }
  else if (digitalRead(button1) == LOW)
  {
    digitalWrite(led2, LOW);
    digitalWrite(led4, LOW);
  }
  else if (digitalRead(button2)==LOW)
  {
    digitalWrite(led1,LOW);
    digitalWrite(led3,LOW);
  }
  else
  {
    digitalWrite(led1,LOW);
    digitalWrite(led2,LOW);
    digitalWrite(led3,LOW);
    digitalWrite(led4,LOW);
  }
}


(part 2)

int leds[] = {0,1,2,3};
int counter = 0;
int buttons[] = {8,9};

void setup()
{
  for (int a=0; a<5; a+=1)
  {
    pinMode(leds[a],OUTPUT);
  }
  pinMode(8,INPUT);
  pinMode(9,INPUT);
}

void loop()
{
  digitalWrite(0,LOW);
  digitalWrite(1,LOW);
  digitalWrite(2,LOW);
  digitalWrite(3,LOW);
  if (digitalRead(8) == HIGH)
  {
    int counter = counter + 1;
    digitalWrite(0, HIGH);
    digitalWrite(1, HIGH);
    digitalWrite(2, HIGH);
    digitalWrite(3, HIGH);
    delay(4000);
    digitalWrite(0,LOW);
    digitalWrite(1,LOW);
    digitalWrite(2,LOW);
    digitalWrite(3,LOW);
  }
  if (digitalRead(9) == HIGH)
  {
    digitalWrite(leds[counter],HIGH);
  }
}

Visual Evidence:

(part1)


(part 2)


Sunday 6 December 2015

Arduino Challenge 3: Button Control (Make Your Own Challenge)

Challenge Name: Button Control LEDs

Author: Christina He

Credit: New Innovators.ca Lab 3

Difficulty Level: Level 2

Time to Complete: Appro. 30 minute

Challenge Description: Make two LEDs to blink on and off according to the button. When the button is pressed, one LED will turn on while the other will stay off. When the button is released, the LED that was on will turn off, while the other that was off will turn on for one second and then switch back. The program will repeat.

Answer:

Code 

int button = 2;
int led1 = 8;
int led2 = 9;

void setup()
{
  pinMode(led1, OUTPUT);
  pinMode(led2, OUTPUT);
  pinMode(button, INPUT);
}

void loop()
{
  if (digitalRead(button) == HIGH)
  {
   digitalWrite(led2, LOW);
   digitalWrite(led1, HIGH);
   delay(1000);
  }
  else
  {
    digitalWrite(led1, LOW);
    digitalWrite(led2, HIGH);
    delay(1000);
  }
}

Visual Answer